
From this page it is possible to download the image of the HamPack SD-Card, the Raspberry PI4 configuration that I use for mobile activities, and by extension, for emergency communications. It is an installation specifically designed for mobile use, therefore it has some specific features, which I will describe in detail.
Given that the aim is to able to operate on the field, the development starts from two main design constraints: 1) the system as a whole must operate entirely from 12V power supply, with the lowest possible current absorption and 2) it must not depend on any type of external service.
My mobile setup has as key element the FT-897d transceiver, which in addition to the two internal battery packs (12Ah, home self), is powered by two 45Ah lead batteries. I also have handy in my backpack a 12V/10A ‘brick’ type power supply, which can be used as a ‘support’ the batteries where main supply is available. The ‘radio’ setup is completed by an MFJ-900 antenna tuner, two home made un-uns (4:1 and 9:1) for end-fed & Rybakov antennas, a Diamond W735 dipole for 40 and 80m, an Outback-2000 mobile antenna for HF and a Diamond NR770 for VHF/UHF.
The choice of Raspberry for the IT part was determined by several factors. The main one was its 5V power supply, when I started this project laptops required muach more than 12V to be charged. Moreover, I derive 5V rail from the 12V one using a buck converter based on LMR51430, which has an efficiency higher than 90%.
Another important feature is the presence of the GPIO interface.
Monitor and keyboard
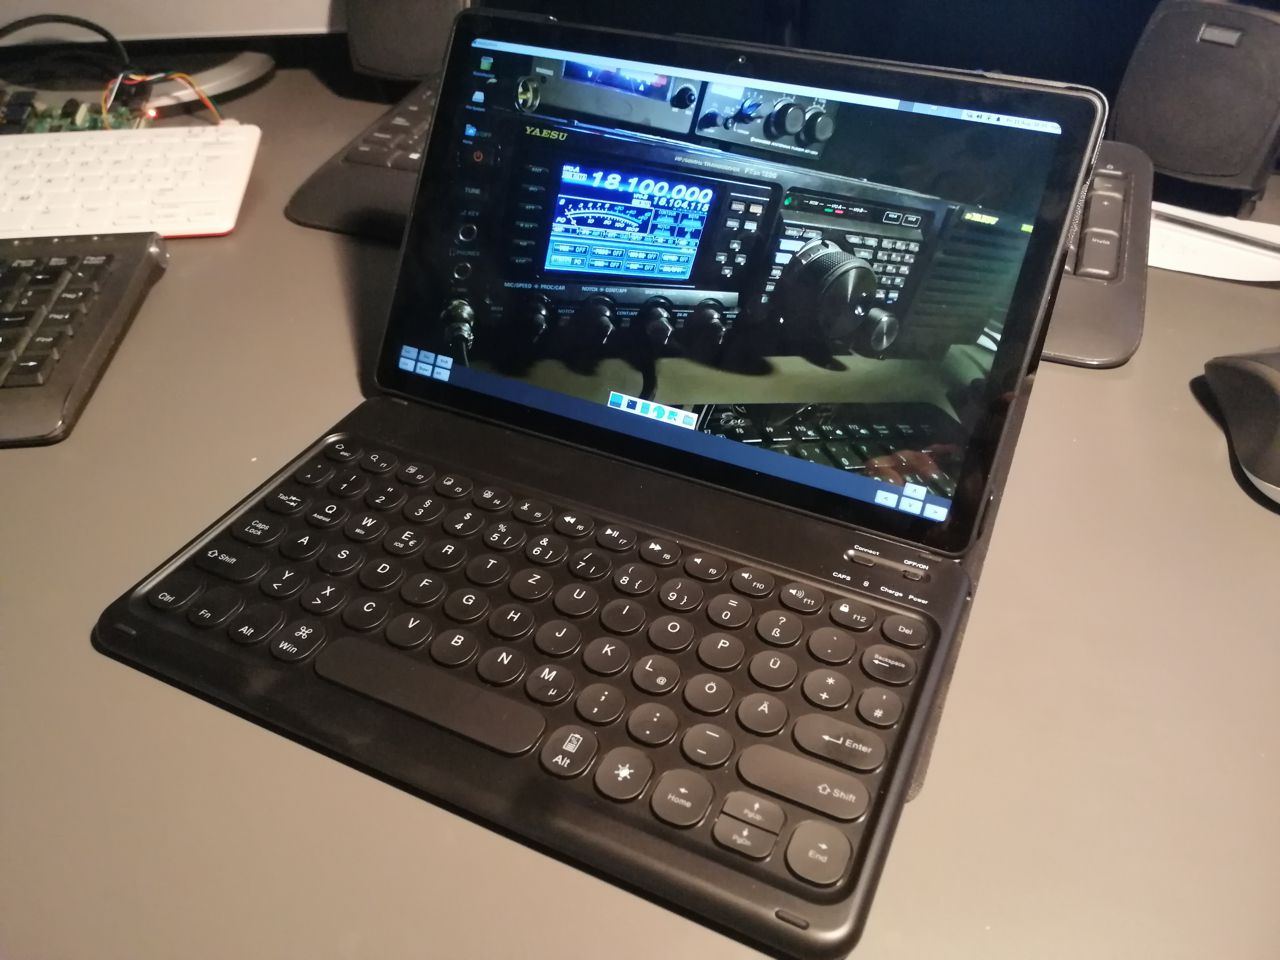
RPIs need a monitor and keyboard to operate, so mobile setups generally use a LCD touch panel and a wireless keyboard/mouse. My approach is different, I run my Raspberry in headless mode, with no pheriperal connected to it, and I access it using a tablet (or even a smartphone) connected via Wi-Fi. For this purpose, the WiFi interface of the Raspberry is configured as hotspot with SSID HAM and password hamradio . Once the tablet is connected to the hotspot, it is simple to access the operating system of the Raspberry using a normal RDP client at the address 192.168.210.1

Just enterr your credentials – the one in the image are user ham , password radio, and you have access the xfce4 desktop.

This approach has a number of advantages: it allows you to avoid the use of specialized hardware, reduce the amount of energy drawn from the main power supply, make you able to easily use even relatively phisically small devices since RDP clients generally allow you to zoom the screen . It is also possible to use even very old devices – for example it works fine on a Galaxy Tab GT-P1000 from 2010 with Android 3, using aRDP free software.

Obviously with a modern device – in this case a Tab A7 – and an external bluetooth keyboard you have a mobile setup that has nothing to envy to a traditional laptop.
Clock
You know that modern digital weak sign modes require the use of an extremely precise time reference. The Raspberry, on the other hand, does not even have an hardware clock and normally it gets the time from data network. To overcome the problem, I have equipped my setup with a GPS receiver to be used both to obtain the position and an accurate time reference.
To have an accurate synchronization, however, it is necessary to use a GPS module which, in addition to the serial data (NMEA, which contains time and position together with other data), also supplies an additional signal called PPS . I used a low cost module called VK2828 , which has a TTL logic level interface compatible with the GPIO of the Raspberry, and which it is able to supply PPS signal. It is connected to the GPIO according to this scheme: EN and VCC at pin 1, GND at pin6, RX at pin8, TX at pin 10, PPS at pin 12.

The GPS module is handled by gpsd for the positioning part, and by chrony for the time component. Chrony is a software designed to manage the acquisition of time data both from the network and from other sources, in our case the GPS PPS signal, even if discontinuous. If present and synchronized, the PPS signal operates as a stratum 1 source . The software operates transparently to the user, but for use with weak signal technology it is important to know the quality of the time reference. For this purpose I wrote a small utility, gpsclock , which displays, in addition to GMT time, a series of additional information useful for mobile use:

1) system time, GMT, 2) Maidenhead Grid Square Locator, 3) elevation above sea level, 4) number of visible satellites, 5) GPS fix status, 6 ) clock source, GPS is the PPS signal received from the satellites, NTP indicates that it is synchronized with a network server, RTC that the source is the system clock. Are information that quickly inform about the quality of time indication at a glance. A more precise picture of the state can be obtained by opening a terminal and typing chronyc sources:

Which lists all sources available end relative time offsets. The source used for getting the time is the one with an asterisk on S column. It is possible to get more detailed information on the source used by typing the chronyc tracking command instead :

Incidentally, chrony is also configured to act as an NTP server, and is reachable from all devices on the local network (192.168.0.0/16). The installation can therefore be used ‘as it is’ to provide a high-precision time signal, independent of the Internet status.
To get detailed information on the GPS status, I added an item called Gps Status in the hamradio menu, which shows all the useful information in a window, updated every second:

GPS data is also accessible via the local network on TCP port 2947, so that it also can be used by other local devices.
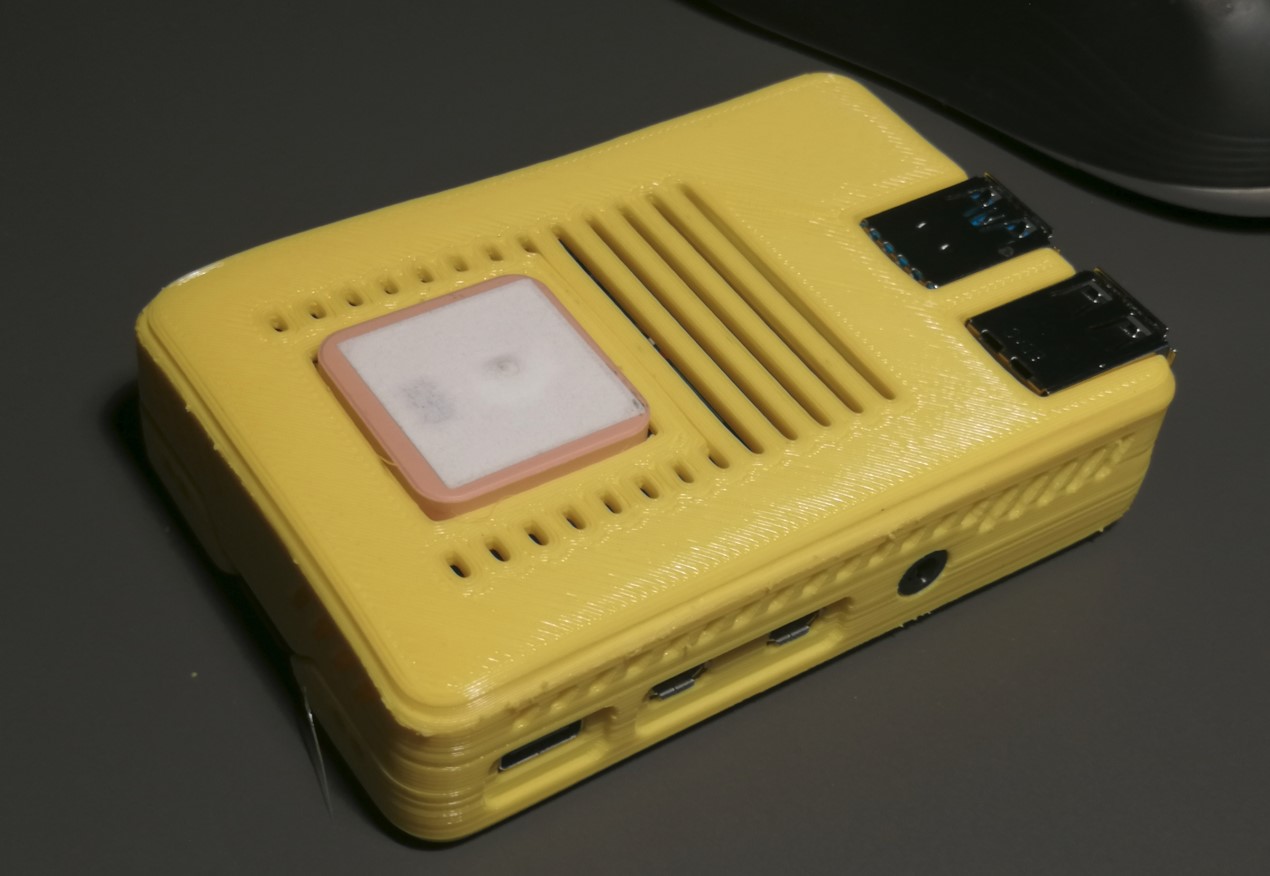
The competed device, mounted inside a 3d printed case, is very compact.
Applications
On the image are pre-installed a series of applications that I normally use on the radio, in alphabetical order:
- CHIRP
Tool to program ham radio transceivers - DIREWOLF
Sound modem for AX25 - FLDIGI
Ham radio digital modes software - FLRIG
Rig remote control - KLOG
Logging program - LINPAC
AX25 terminal - QSSTV
SSTV Software - WSJTX
Weal modes software - XASTIR
APRS software
The applications must obviously be configured according to the setup and the operator. Are all very common programs, so it is simple to find on the internet all the information useful for their correct use.
Interfaces
recent rigs can be connected directly to USB, without the need for additional hardware. For older devices, like my FT-897, it is necessary to use two interfaces, one for audio and the other one for CAT (device management). But, in my experience, there is no need to use specialized interfaces.
In my mobile setup I use a USB audio stick with a CM108 chipset as audio interface, and a USB/Serial TTL cable with a Prolific chipset as data interface. From a purely practical point of view, any device compatible with Linux 6.1 will do. The only attention is that the audio interface has availabe a sample rate of 48kHz: “WSJT-X expects your sound card to do its raw sampling at 48000 Hz” [user manual]. The reason is that WSJT-X (and derived software) resamples audio at 12 kHz for DSP processing (6 kHz bandwidth). 48 is a multiple of 12 and therefore produces a much better result than CD quality sampling (41kHz). The problem, however, does not exist for the other digital modes.
In my shack setup I use a cable that intepose, more as a precaution than out of real necessity, a couple of 600 ohm 1:1 transformers on both the line-in and line-out lines. for my mobile one I prefer to use a stronger, direct cable without transformers, favoring reliability, and I’ve never encountered any problems.
For the FT-897, which has CAT at TTL level (0-5V), the USB/Serial interface is the type normally used with microcontrollers, such as Arduinos, and is therefore very easy to find and very cheap. You need just to wire minidin connectors on the device side, following the instructions from your rig operating manual. Other rigs may instead have RS-232 (-12/+12) serial interfaces, but even in this case are available general purpose cables, easy to find and cheap.

My CAT cable, on the left, has an ‘adapter’ on the radio end, so that on the field I can carry just one cable with me, along with specific adapters for the rigs to be managed and/or programmed.
More info
It is of course possible to add other users to the system (for example, to manage different configurations), but once created it is necessary to assign them to the dialout, sudo, audio and netdev groups to keep the system operational.
The system is already configured to access a wired network connection, as well the hotspot is also configured to share the internet connection (if available) with all devices connected to it. If you want to be able to use tethered access on a mobile, just add a second USB wireless interface and configure it using the network applet, top right.

selecting edit connection, and creating a new wifi connection with the characteristics required by tethering. Also in this case, the devices connected to the HAM hotspot will have internet access available. For security reasons, the graphical configuration of the network is disabled on RDP connections, but the same operation can be done using the semi-graphical version: just open a terminal window and type the command sudo nmtui, selecting activate a connection from the menu.

At this point it is sufficient to choose the desired network and enter its password to configure and activate it.
Superuser access ( root ) is not disabled, as usually happens in raspbian, but has a password (toor) to be able to access the system via ssh.
Downloads
Version 2.1, updated in August 2023, can be downloaded here:
. It can be installed on SDCards starting from 4GByte, but it is preferable to use one of at least 8, preferably fast.Once you have written the image, on the first run it is necessary to launch raspi-config, select Advance options menu and run Expand filesystem, in order to use all the space available on your memory card.